- AI Booking Workflow
- WhatsApp Configuration
- Meta App Live Process
- WhatsApp Template Setup
- Custom Booking Fields
- Train AI Assistant
- Staff , Role, Permissions
- Room Settings
- Room Bookings Management
- Room Edit & Assignment
- Rooms Management
- Refunds
- Report
- Logo, Favicon
- Payment Gateway Settings
- Language Management
- Email Settings
- Support Tickets
- Topup AI Credits
- Advanced QR Builder
Complete Hotel Booking Workflow using WhatsApp AI Assistant
👉 The WhatsApp AI Assistant automatically handles guest conversations such as room inquiries, check-in/check-out availability, room recommendations, booking requests, guest information collection, and booking management directly through WhatsApp.
👉 Below is the complete workflow showing how the WhatsApp AI Assistant manages the hotel booking process step-by-step.
📅 Step 1
Customer sends check-in & check-out dates along with the number of adults and children to find available rooms via WhatsApp
🤖 Step 2
AI Assistant shows matched available rooms from the hotel database directly inside WhatsApp
🛏️ Step 3
Guest sends booking request by mentioning the room name shown in WhatsApp
📝 Step 4
AI Assistant asks the guest for required booking details on WhatsApp
📊 Step 5
Guest provides details on WhatsApp and AI saves the booking request in the hotel owner dashboard
💳 Step 6
Hotel staff reviews the request and sends a payment link from hotel dashboard on WhatsApp
✅ Step 7
Guest receives payment link on WhatsApp and completes payment using the payment link from website
🏨 Step 8
Hotel staff assigns the room from hotel owner dashboard and confirms the booking
👉 This video demonstrates the complete hotel booking workflow powered by the WhatsApp AI Assistant.
Connect WhatsApp with Hotel Owner Dashboard
Follow the step-by-step setup process below to connect your hotel WhatsApp
number with the Hotel Owner Dashboard and WhatsApp AI Assistant.
After completing these configurations, the AI Assistant will be able to
communicate with guests, answer hotel-related questions, manage booking requests,
and automate hotel customer support directly through WhatsApp.
👉 First Step: Meta Business Portfolio Account Creation
Create a Meta Business Portfolio account to access WhatsApp Business Platform features. This account is required to connect your hotel WhatsApp number, manage business assets, and configure WhatsApp API services.
👉 Second Step: Meta App Creation
Create a Meta App from the Meta Developer Dashboard. This app is required to enable WhatsApp API integration, generate API credentials, and establish communication between your hotel dashboard and WhatsApp services.
👉 Third Step: Meta App Live Setup
This video demonstrates how to make your Meta app live for WhatsApp integration.
👉 Fourth Step: WhatsApp Webhook Setup
Configure the WhatsApp webhook URL and verify token to enable real-time communication between WhatsApp and your hotel dashboard.
How to Publish the WhatsApp App for Real Guest Communication:
Why do we need to publish the WhatsApp app?
👉 To use a real business WhatsApp number for guest communication, the
Meta app must be Published/Live.
👉 Meta requires adding a payment method before using a real business
number, and adding a payment method
is only possible after the app is made live.
WhatsApp Template Setup:
👉 WhatsApp Templates are used to manage the customized automated messages sent to
customers
during different booking and communication events.
👉 These messages are predefined by the
hotel owner and are not AI-generated.
👉 These templates allow hotel owners to customize how the system communicates with
guests
through WhatsApp.
👉 For example, when a customer completes a booking, the system can
automatically send a customized confirmation message to the customer using these
templates.
Manage Templates:
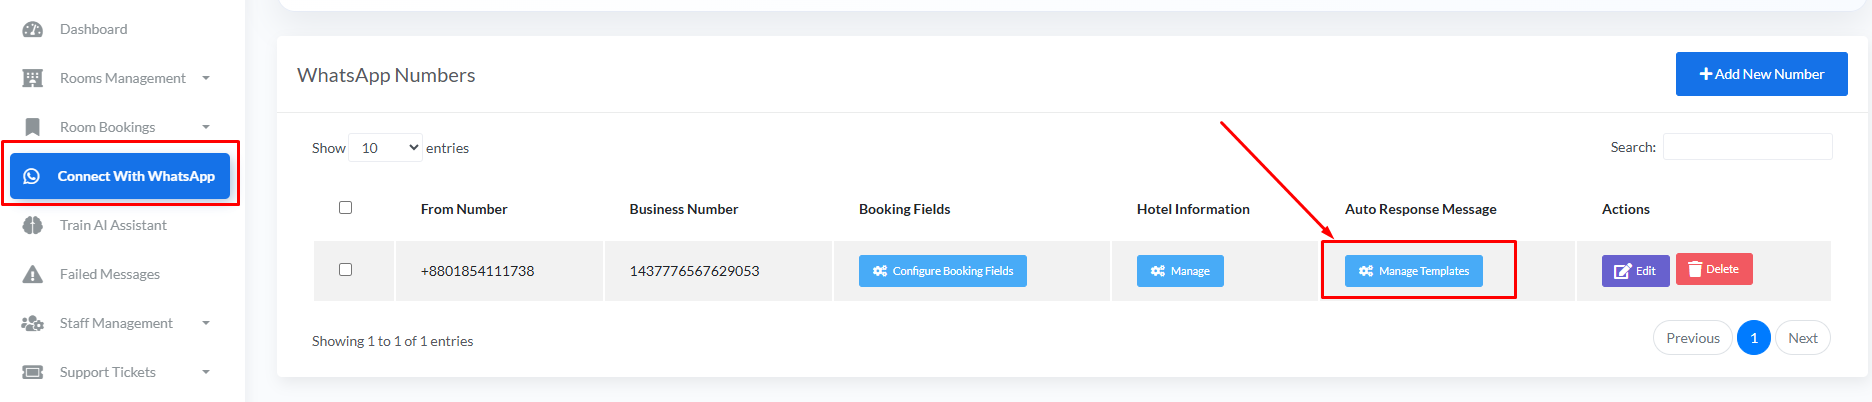
Hotel owners can manage WhatsApp message templates from Connect With WhatsApp > Manage Templates.
Clicking the Manage Templates button will open the list of available WhatsApp templates.
Template List:
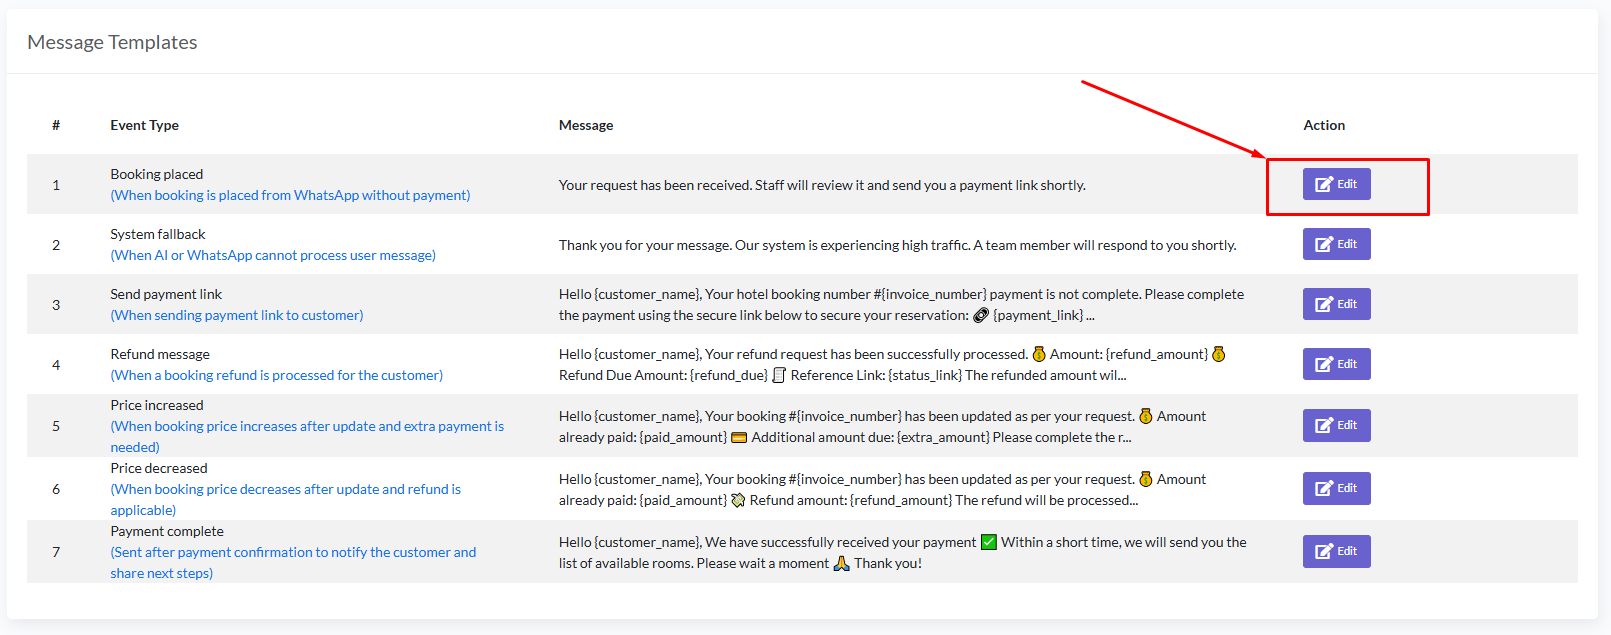
In this section, hotel owners can view all available WhatsApp message templates along with their event types and current messages.
To modify a template message, click the Edit button beside the template.
Edit Template:
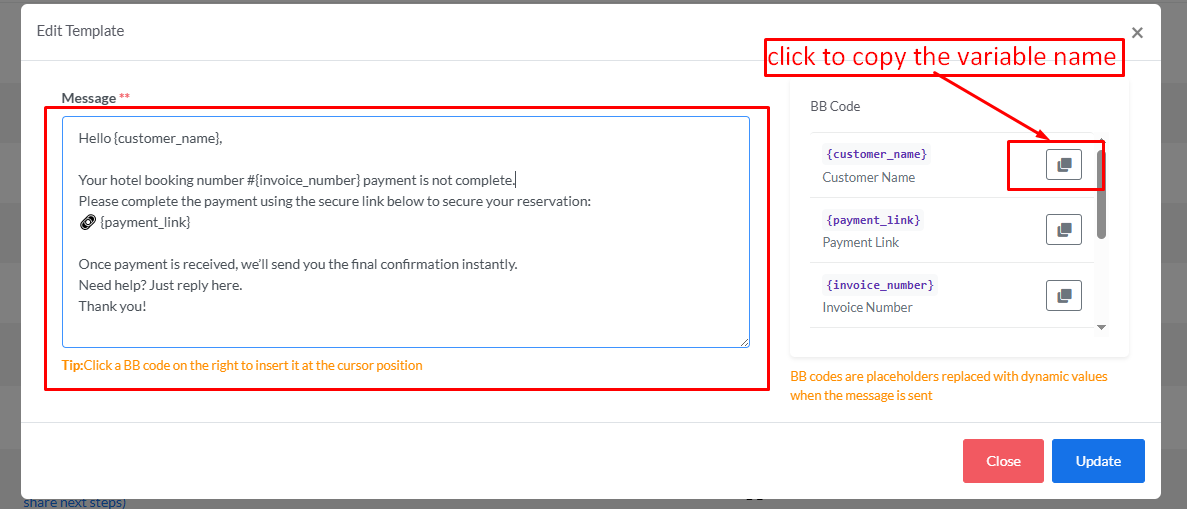
Hotel owners can customize the message content according to their business needs.
BB Codes shown on the right side are dynamic placeholders that will be automatically replaced with real booking information when the message is sent.
Clicking the copy button beside a BB Code will copy the variable name, which can then be pasted into the message content.
BB Code Variables:

Variables such as customer name, invoice number and payment link can be inserted into template messages using BB Codes.
These variables help create personalized WhatsApp messages automatically for each booking and customer interaction.
Custom Booking Information Collection from Guests:
👉 During the booking conversation, the AI assistant automatically collects some important booking information from customers such as customer name, email, phone number, arrival date, departure date and guest count.
👉 If hotel owners need any additional information from customers, they can create custom booking fields from this section. Once a custom field is added, the AI assistant will automatically ask that question to customers during the booking process.
Configure Booking Fields:
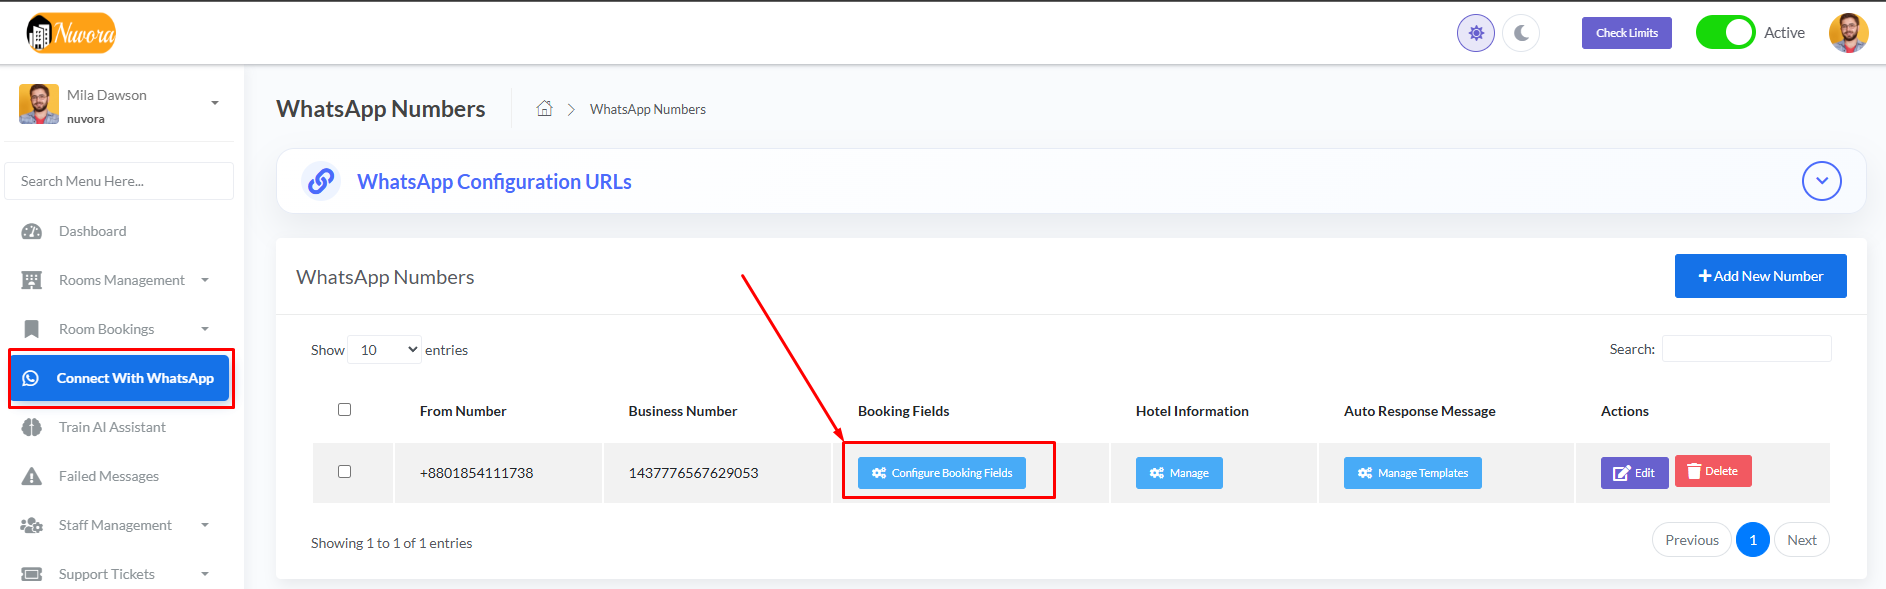
Hotel owners can configure additional booking information fields from Connect With WhatsApp > Configure Booking Fields.
Automatically Collected Information:
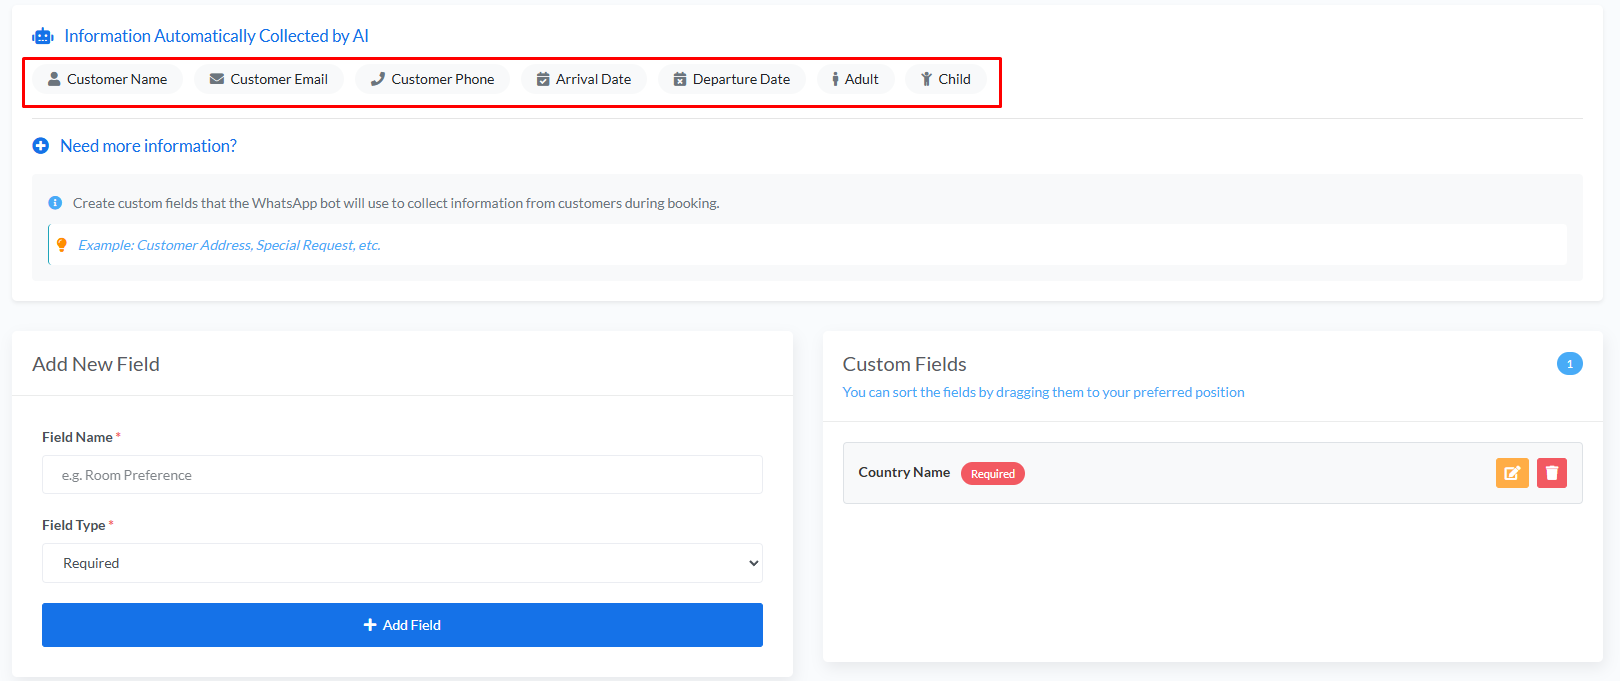
These fields are automatically collected by the AI assistant during every booking conversation.
Add New Custom Field:
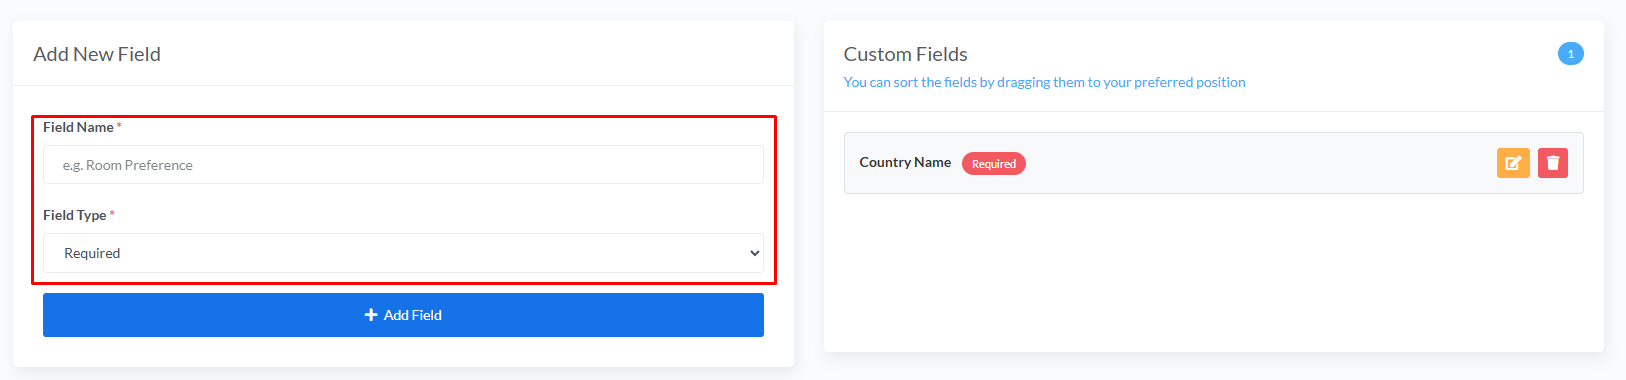
Hotel owners can create additional fields by entering a field name and selecting whether the field will be required or optional.
Example: Customer Address, Passport Number, Special Request, Flight Number, etc.
Custom Fields List:
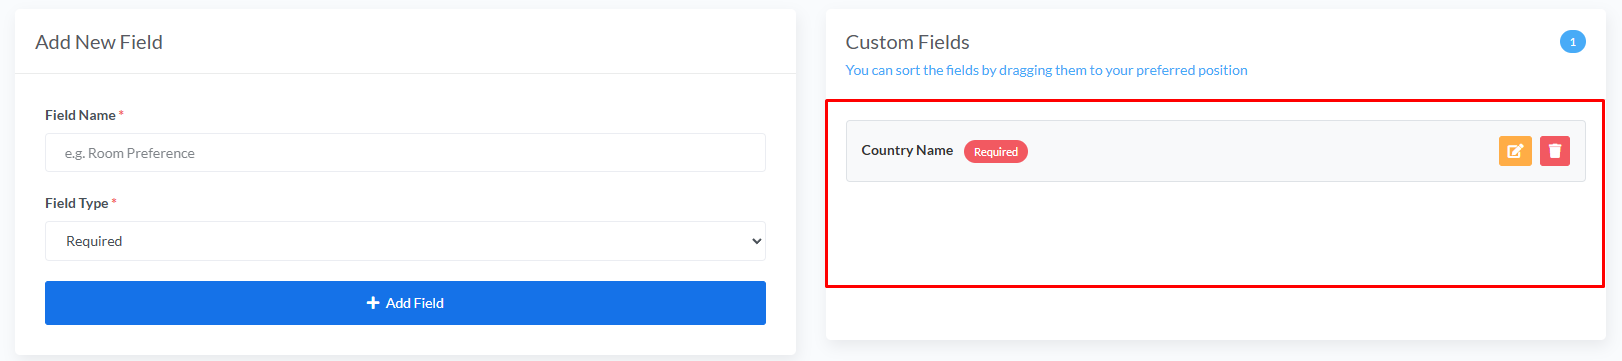
All created custom fields will appear in this section.
Hotel owners can edit, delete and reorder the fields according to their preferred booking flow.
Train AI assitant for customer queries:
👉 Hotel owners can train the AI assistant by adding hotel-related information such as hotel policies, complimentary services, food details, facilities, FAQs and other important information that customers may ask about.
👉 This helps the AI assistant answer general customer questions more accurately through
WhatsApp.
👉 For example, if customers ask about complimentary breakfast, check-in/check-out time,
hotel rules or available services, the AI can respond based on the information provided
here.
Upload Documents to Train AI:
👉 Hotel owners can upload a document file containing hotel information. After submitting, the system will extract the text from the uploaded file and show it in the Extracted Text box.

Edit or Add Information Manually:
👉 Hotel owners can also write or edit information directly inside the Extracted Text box without uploading a new file.
👉 After editing the text, click the Submit button to update the AI assistant.

Staff, Roles & Permissions Management:
👉 Hotel owners can create staff accounts and manage role-based permissions for different team members from this section.
👉 This allows hotel owners to control which modules and features each staff member can access inside the dashboard.
Roles & Permissions:
👉 Hotel owners can create different staff roles and manage their permissions from Staff Management > Roles & Permissions.
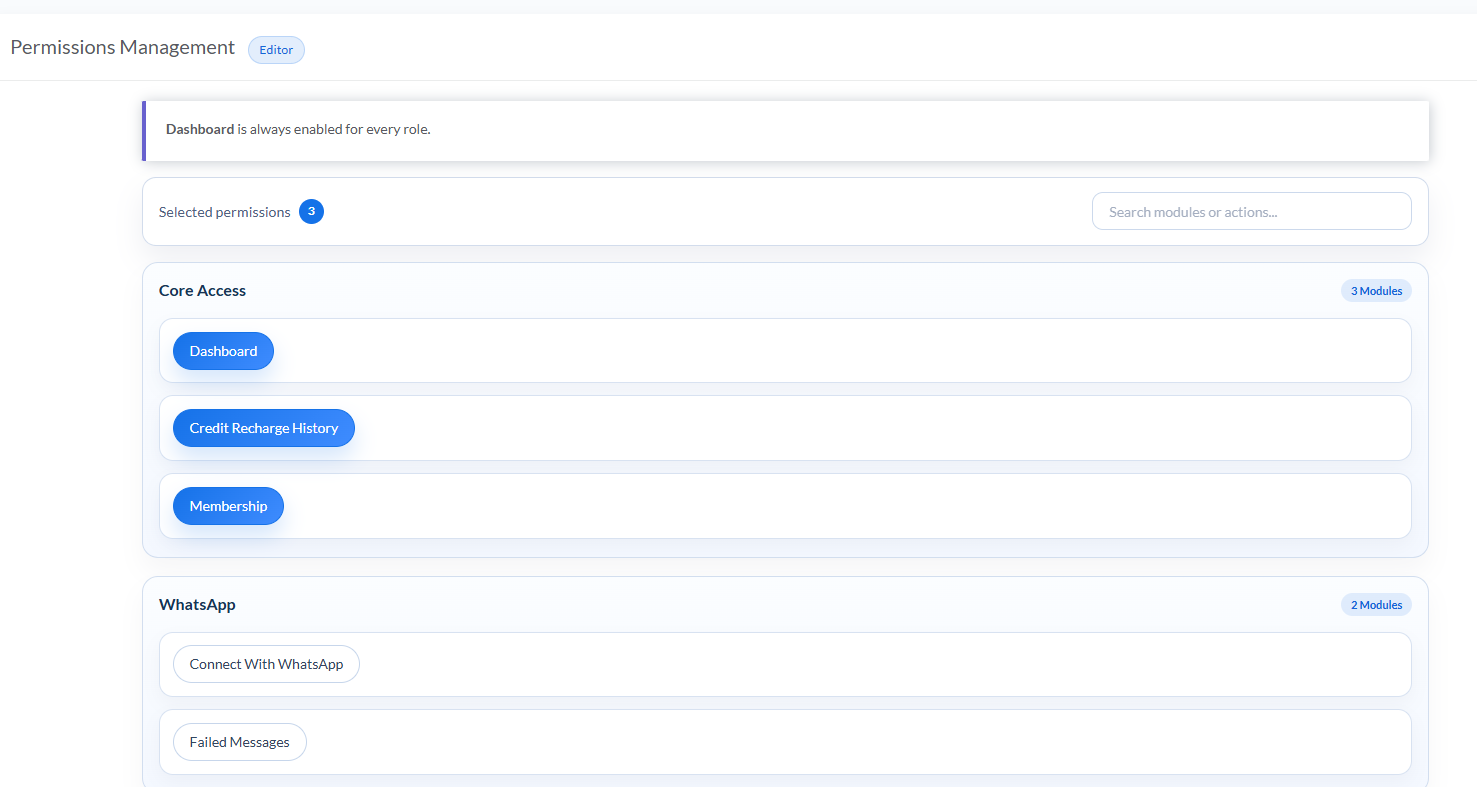
👉 Clicking the Manage button allows selecting which modules and actions will be accessible for that role.
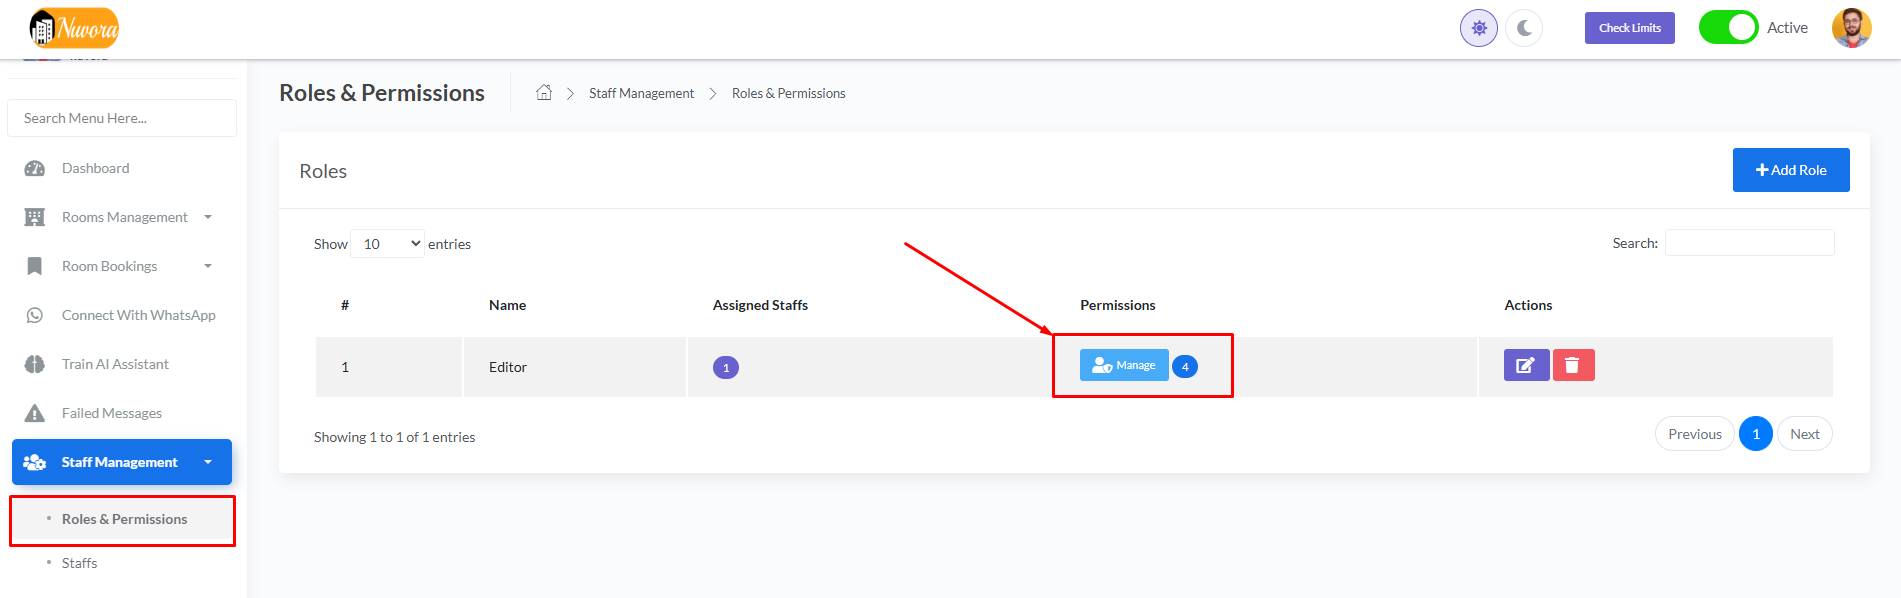
Permission Management:
👉 Hotel owners can enable or disable access permissions for different modules based on staff responsibilities.
Staff Management:
👉 Hotel owners can manage all staff accounts from Staff Management > Staffs. Clicking the Add Staff button will open the staff creation form.

Add New Staff:
👉 To create a new staff account, hotel owners need to enter staff information such as name, email, username, password and assign a role.
👉 Once created, the staff member will only be able to access the modules permitted for their assigned role.

Room Settings:
👉 Hotel owners can configure important room booking preferences such as check-in/check-out time, booking cancellation policy and refund settings from this section.
Preferences:

Hotel owners can manage booking preferences from Rooms Management > Settings > Preferences.
- Check-in Time: Defines when customers are allowed to enter and access their booked room.
- Check-out Time: Defines the maximum time customers must leave the room after their stay.
- Room Booking Cancellation: If enabled, customers will be allowed to cancel their bookings.
- Cancellation Time Limit: Defines how many hours before check-in a customer can cancel the booking.
- Refund Percentage: Defines how much percentage of the paid booking amount will be refunded if the booking is canceled within the allowed cancellation time.
Fees & Tax:
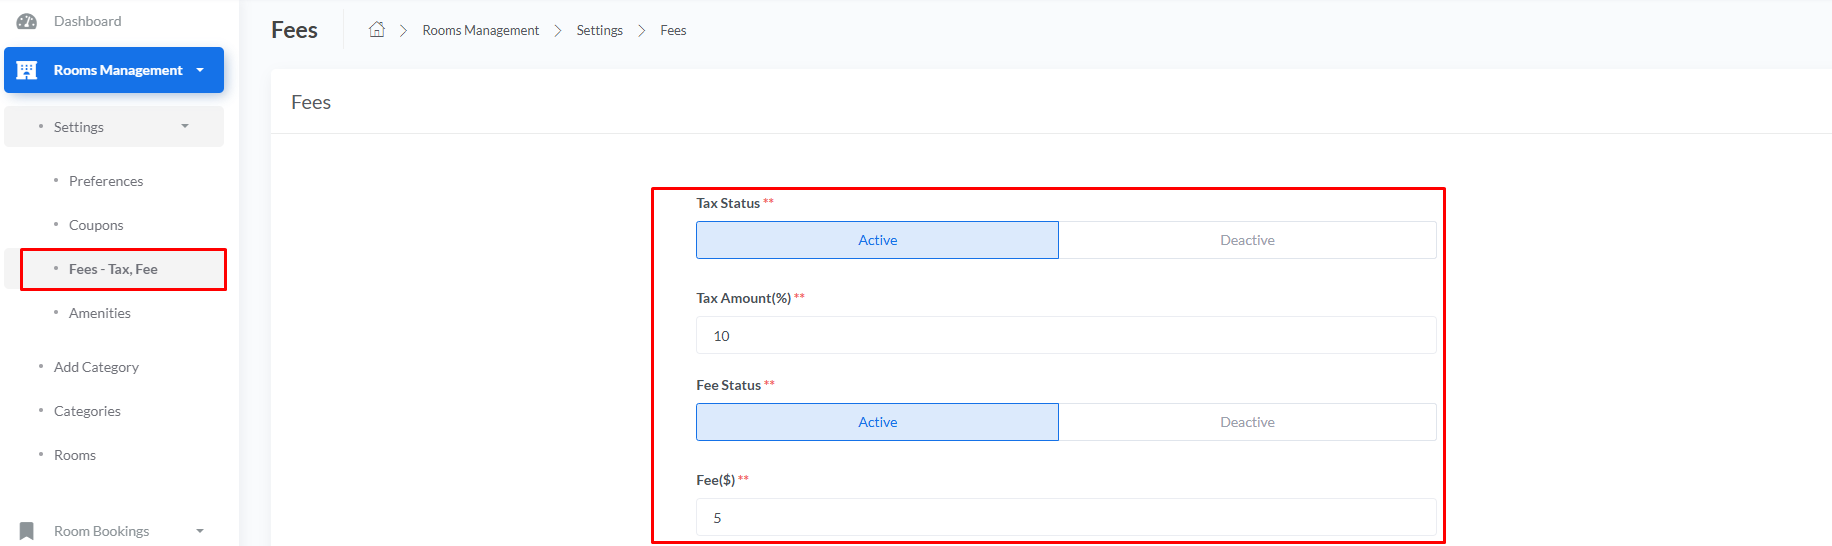
Hotel owners can configure booking tax and additional service fees from Rooms Management > Settings > Fees - Tax, Fee.
- Tax Status: Enables or disables tax calculation for room bookings.
- Tax Amount(%): Defines the percentage of tax that will be added to the booking amount.
- Fee Status: Enables or disables additional booking/service fees.
- Fee($): Defines the fixed additional fee amount that will be added to bookings.
Booking Overview:
This section provides a complete overview of room bookings, including booking status, payment status, stay status, payment links and booking sources.
Hotel owners and staff can monitor and manage bookings created from both the website booking system and the WhatsApp AI Assistant.
Payment Link:
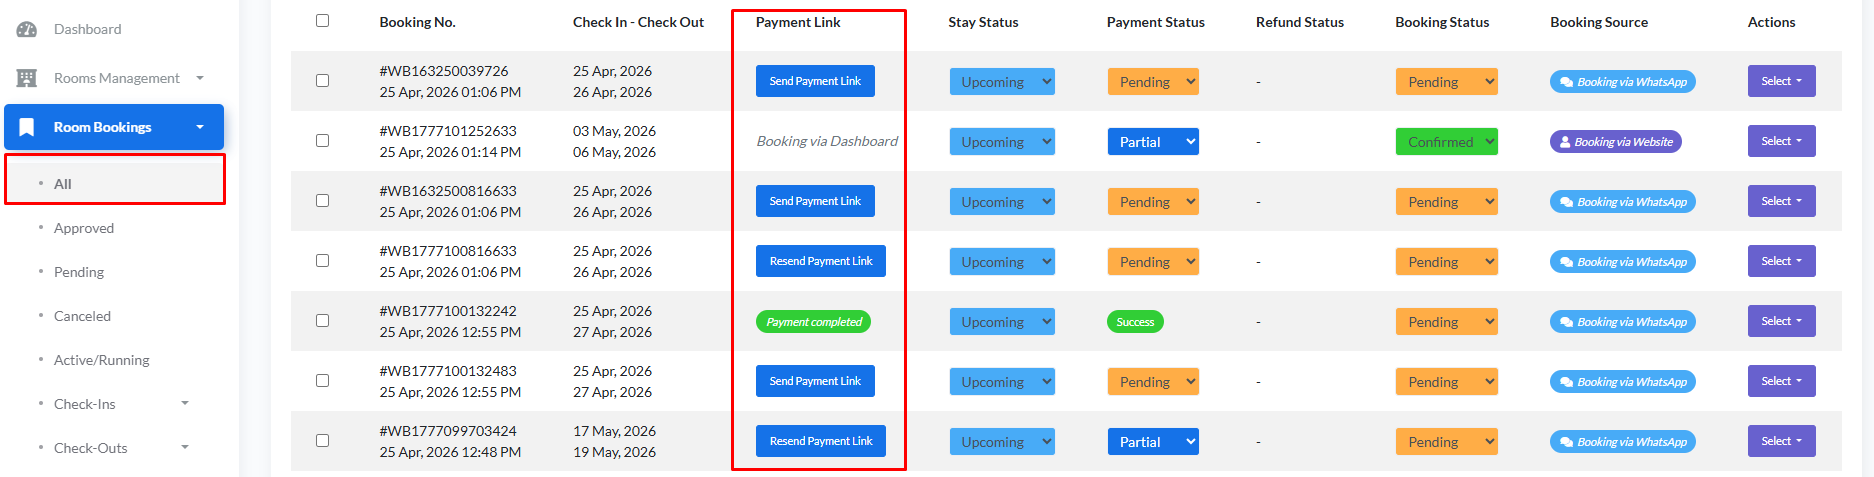
The payment link section helps hotel owners and staff manage customer payments based on the booking source and payment progress.
- Booking via Dashboard: This status appears when a hotel owner or staff manually creates a booking directly from the dashboard. In this case, no WhatsApp payment link will be available.
- Send Payment Link: This option appears only for bookings created through the WhatsApp AI Assistant. Hotel owners or staff can send a payment link to the customer to complete the booking payment.
- Resend Payment Link: After a payment link has already been sent once, the system will show the resend option. Hotel owners or staff can resend the payment link unlimited times if needed.
- Payment Completed: This status appears when the customer successfully completes the payment. It can also appear if the hotel owner or staff manually updates the booking payment status as completed.
Stay Status:

Stay status helps hotel owners track the current stay condition of customers.
- Upcoming: Customer has not checked in yet.
- Checked In: Customer has already checked into the room.
Payment Status:

Hotel owners can update and monitor the current payment condition of bookings.
- Pending: Payment has not been completed yet.
- Success: This status appears when the customer completes the full booking payment successfully.
- Partial: This status appears when the customer makes only an advance or partial payment for the booking.
- Rejected: This status appears when the hotel owner or staff manually rejects the payment due to payment issues or other reasons.
Note: Payment status can only be updated after a room has been assigned to the booking.
Refund Option for Booking Cancellation:
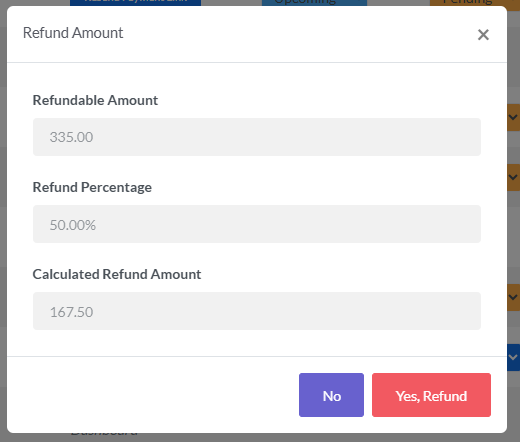
👉 Appears when a paid or partially paid booking is canceled or rejected.
👉 When the booking is canceled, the system automatically calculates the refundable amount based on the cancellation and refund settings configured in See Room Settings Preferences Details.
- Refundable Amount: Shows the paid amount that is eligible for refund.
- Refund Percentage: Shows the refund percentage configured in room booking preferences.
- Calculated Refund Amount: Shows the final refund amount calculated by the system.
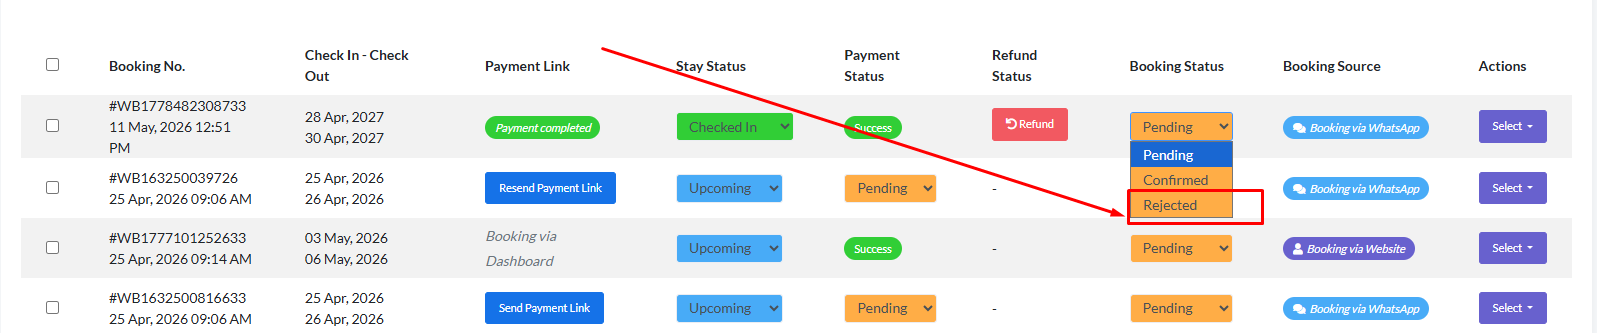
Refund Option for Reduced Room Price:
👉 When the booking amount decreases during room assignment updates, the system will show the refund button for the extra paid amount.
- Partial: Sends only part of the refundable amount to the customer.
- Full Refund: Sends the full refundable amount back to the customer.


Booking Status:

Booking status defines the current approval state of a booking.
- Pending: Booking is waiting for confirmation.
- Confirmed: Booking has been approved successfully.
- Rejected: Booking request has been rejected.
Booking Source:

Booking source helps identify where the booking was created from.
- Booking via WhatsApp: Booking created through the WhatsApp AI Assistant.
- Booking via Website: Booking created directly from the website booking system.
Booking Tracking:
Hotel owners and staff can track bookings based on booking status, check-in/check-out activities and daily booking operations from this section.
Booking Categories:

- Approved: Displays all bookings whose booking status is confirmed.
- Pending: Displays all bookings whose booking status is pending.
- Canceled: Displays all bookings whose booking status is canceled.
- Active/Running: Shows all active bookings where the guest has already checked in but has not yet checked out.
- Check-Ins: Displays all booking check-in activities.
- Delayed: Shows all bookings scheduled to check in today, where the check-in time has already passed but the guest has not checked in yet.
- Upcoming: Shows all bookings scheduled to check in today, where the check-in time has not yet started.
- Check-Outs: Displays all booking check-out activities.
- Delayed: Shows all bookings scheduled to check out today, where the check-out time has already passed but the guest has not checked out yet.
- Upcoming: Shows all bookings scheduled to check out today, where the check-out time has not yet started.
- Today’s Booked: Displays all room bookings created for the current day along with today’s available rooms.
Today’s Booked Rooms:
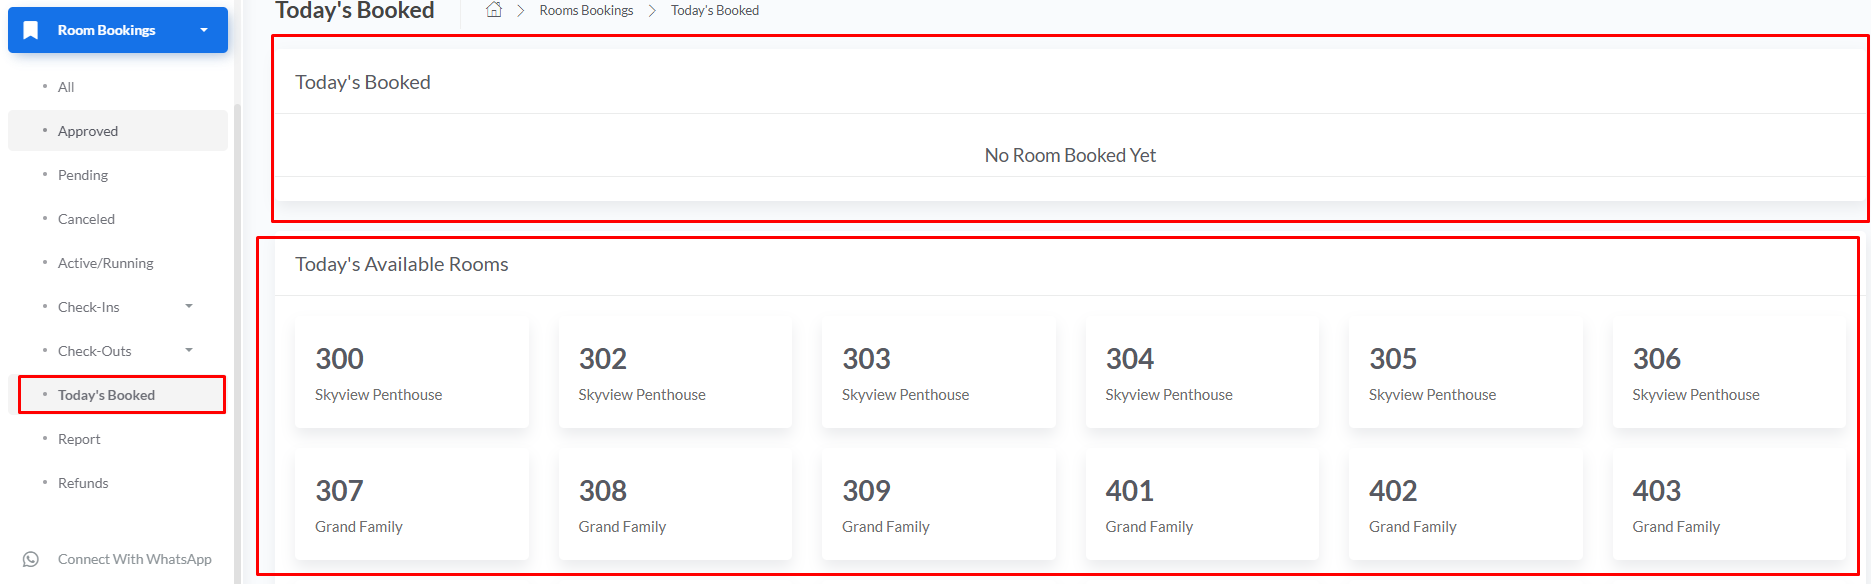
This section displays all bookings created today and also shows the rooms that are currently available for booking.
Room Edit & Assignment:
For bookings placed through the WhatsApp AI Assistant, hotel owners or staff need to assign available rooms from the booking edit page.
The system shows the estimated total amount before room assignment so the hotel owner can understand how much the customer needs to pay after rooms are selected.
Open Booking Edit Page:

From the booking list, click the Actions button and select Edit to open the booking details and room assignment page.
Room Assignment:
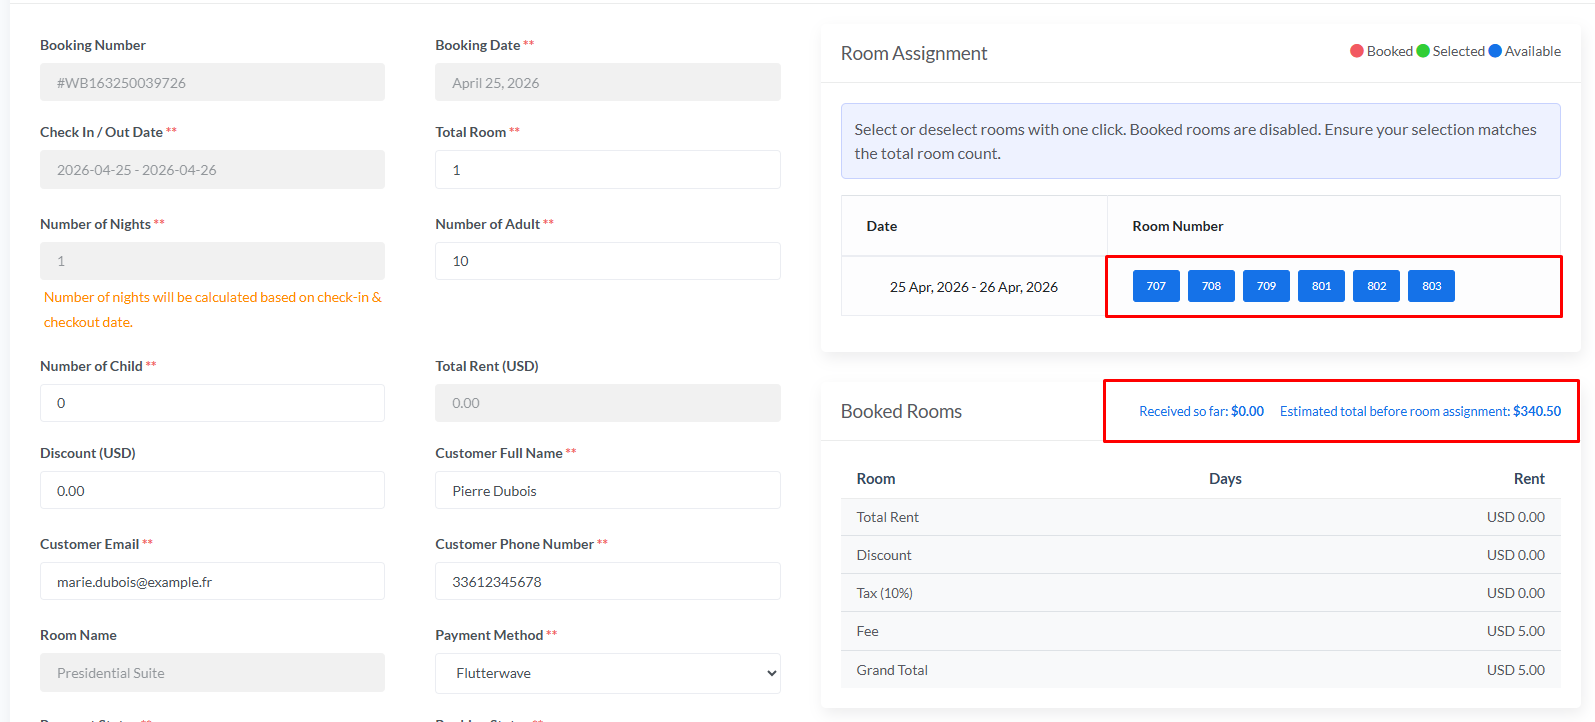
In the Room Assignment section, available room numbers will be displayed. Hotel owners or staff can click on the room numbers to assign rooms for the booking.
The Estimated total before room assignment shows the amount that will be charged after selecting rooms.
Save Room Assignment:
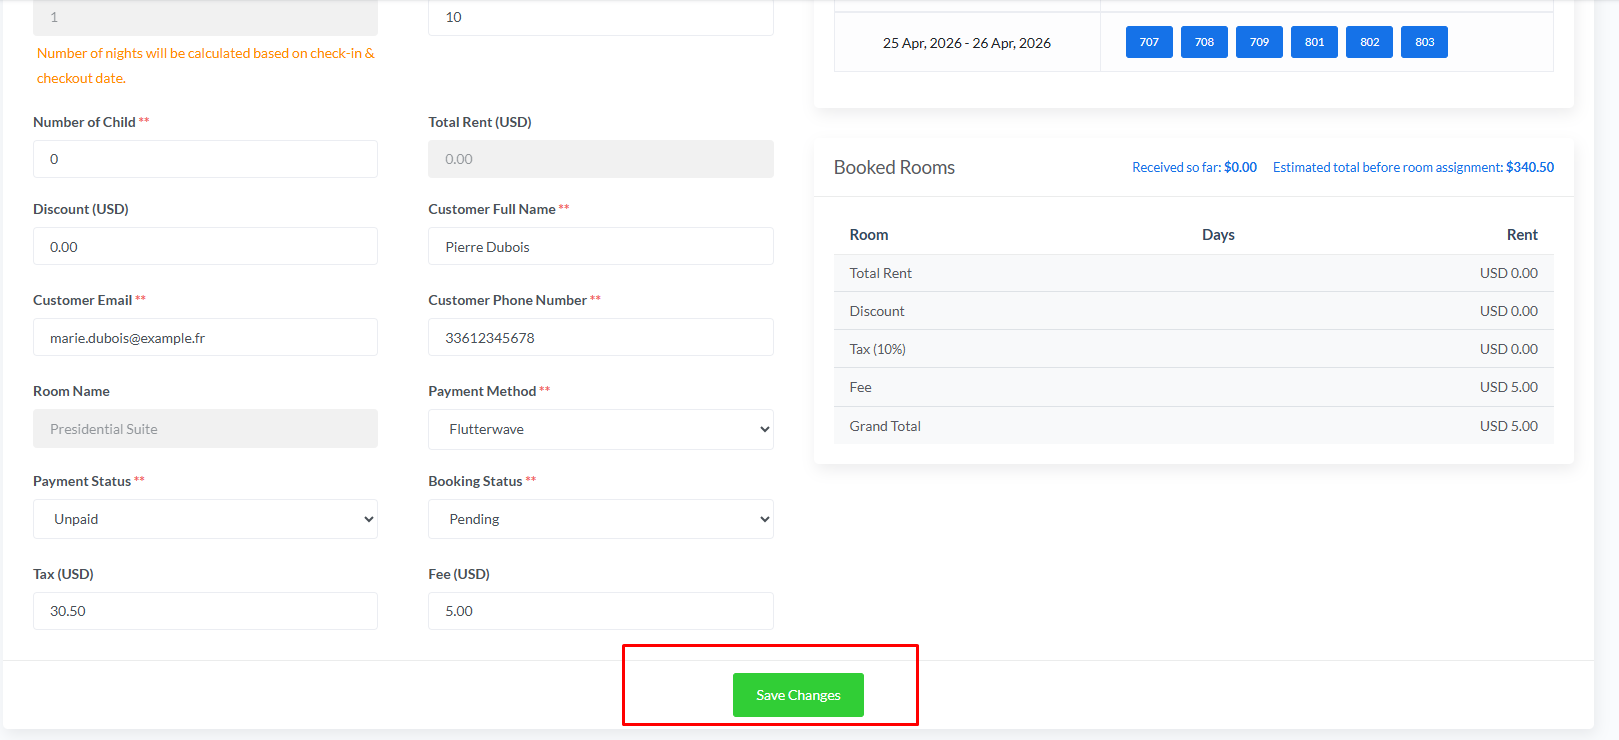
After selecting the required rooms, click the Save Changes button to update the booking and complete the room assignment.
Refund After Room Decrease:
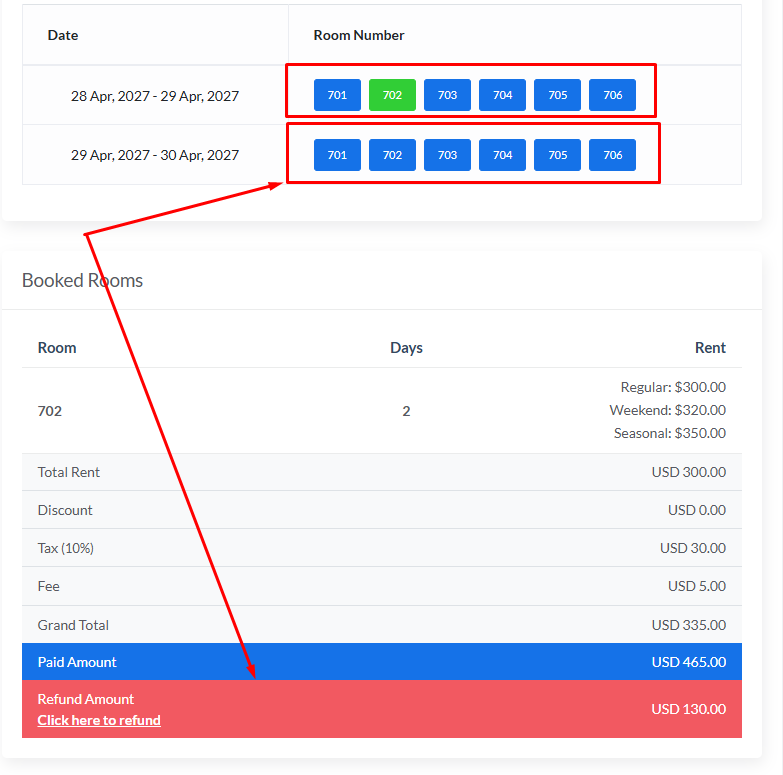
If the hotel owner or staff decreases the number of assigned rooms and saves the changes, the total booking amount may become lower than the amount already paid by the customer.
In that case, the system will show the refundable amount in the booking details section. Click Click here to refund to go to the booking list and process the refund.

From the booking list, click the Refund button for that booking. Then enter/select the refund amount and confirm the refund.
Due Amount After Room Increase:
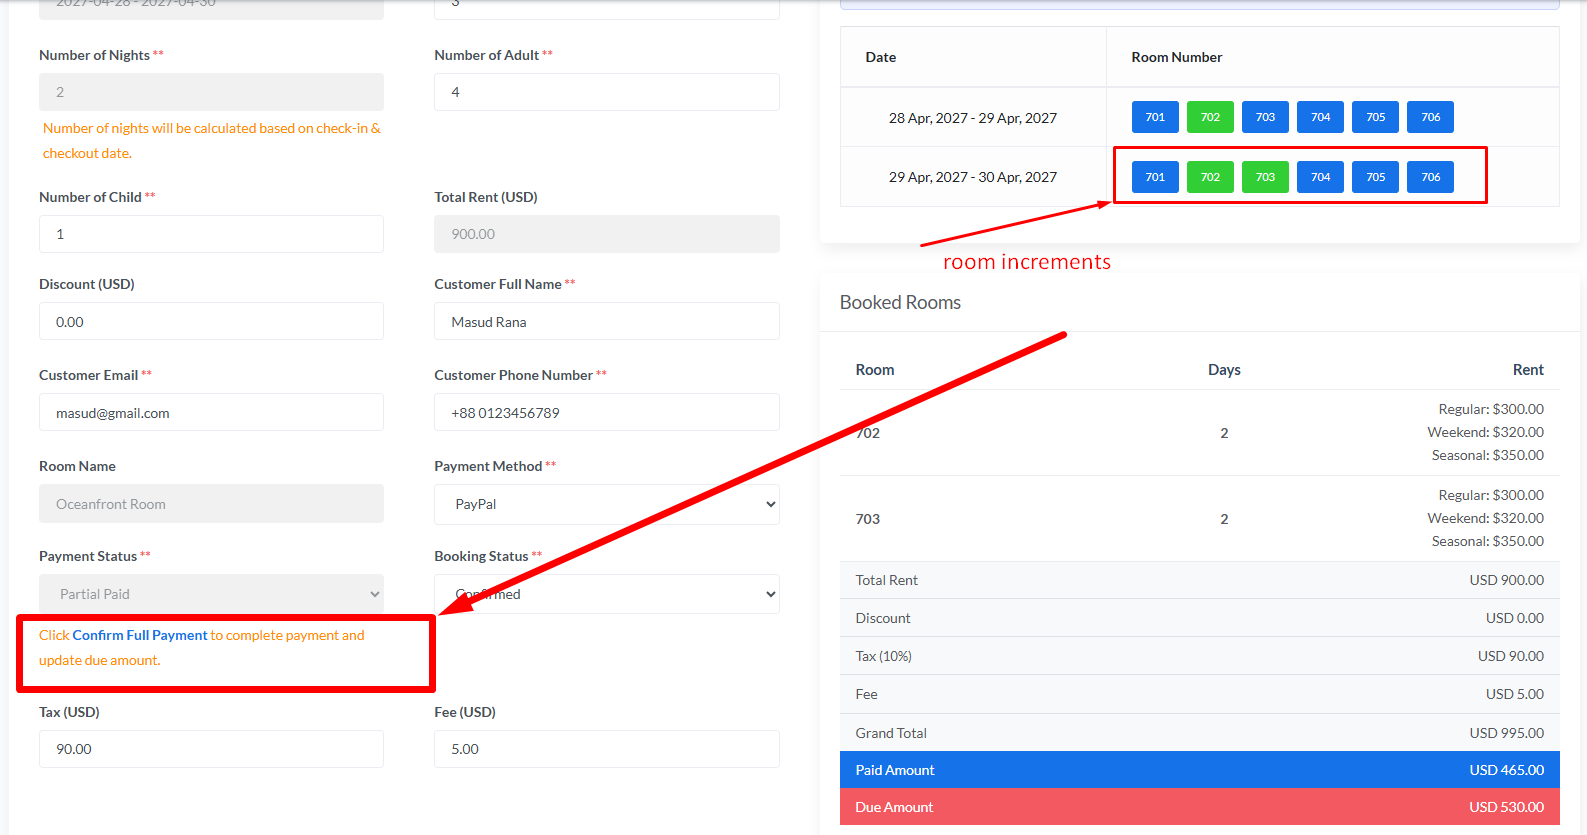
If the hotel owner or staff increases the number of assigned rooms and saves the changes, the total booking amount may become higher than the amount already paid by the customer.
In that case, the system will show the remaining amount as Due Amount. A new payment link will also be sent to the customer through WhatsApp so the customer can complete the additional payment.
Once the customer completes the payment, the due amount will be added to the paid amount automatically.
If the hotel owner or staff wants to mark the due amount as paid manually, click Confirm Full Payment. This will complete the payment and update the due amount as paid.
Rooms Management:
Hotel owners can create and manage room categories from this section. While adding a room category, they can upload room images/videos, add room name, pricing, guest capacity, bed/bath information, payment system and room details link.
Add Room Category:
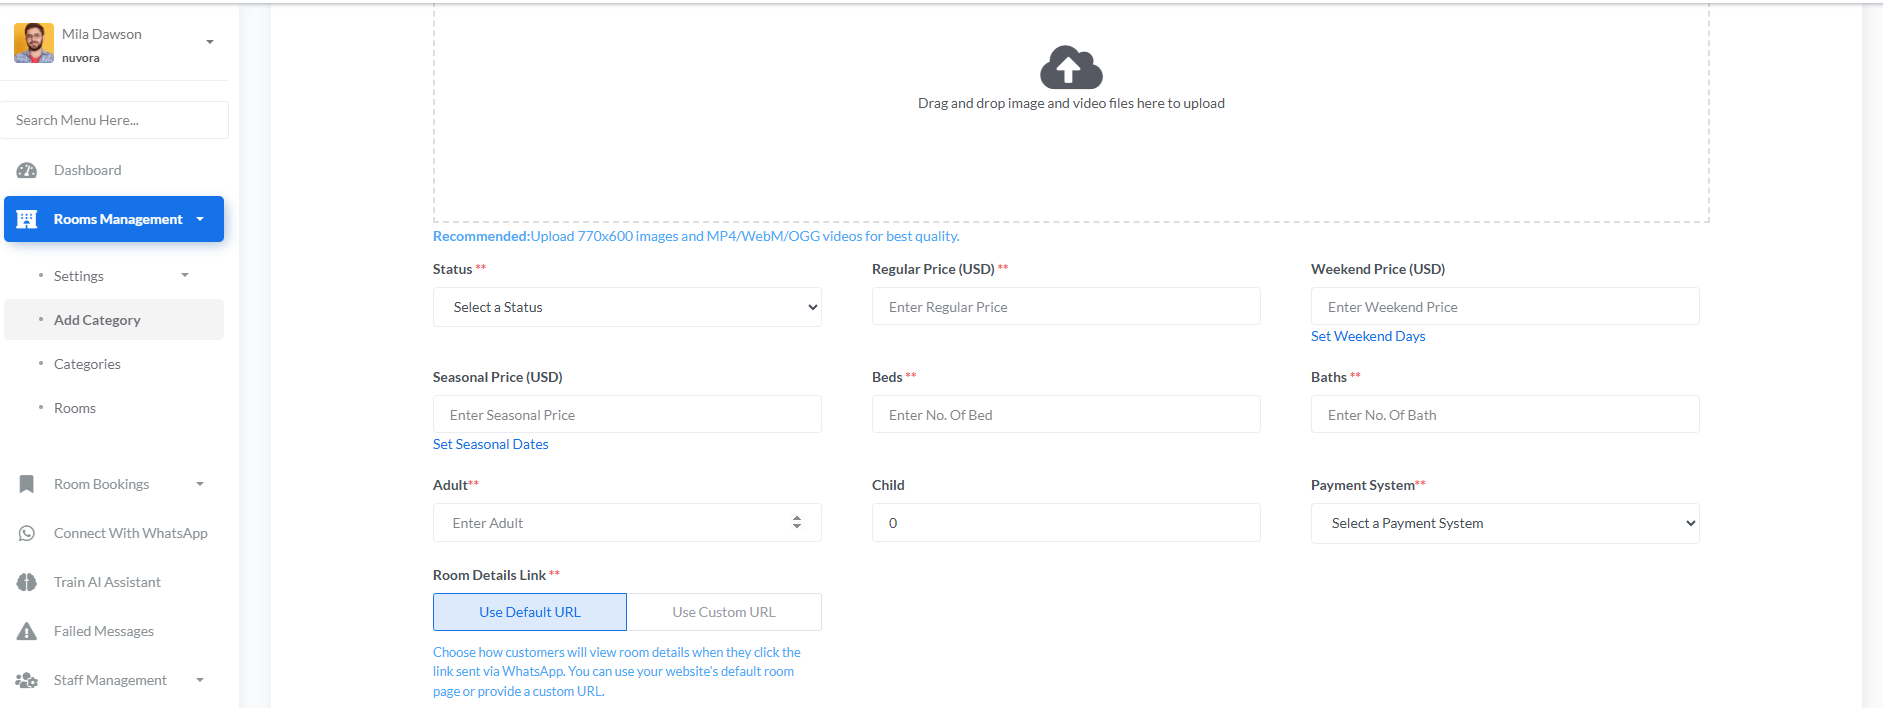
This page is used to add complete room category information such as media, room details, pricing, capacity and payment settings.
Room Pricing System:
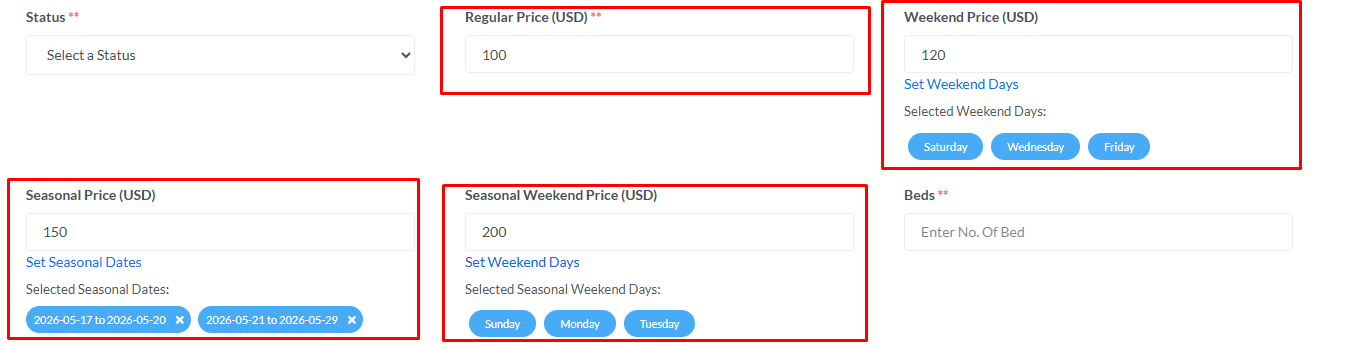
Room pricing is calculated day by day based on the customer's selected check-in and check-out date range. For each night, the system checks which price rule matches that date and then adds the matched price to the total rent.
- Regular Price: This is the default room price. If the booking date does not match any weekend or seasonal pricing rule, the system will calculate that day using the regular price.
- Weekend Price: Hotel owners can select specific weekend days, such as Friday, Saturday or Sunday. If any selected weekend day appears inside the booking date range, that day will be calculated using the weekend price instead of the regular price.
- Seasonal Price: Hotel owners can set special seasonal date ranges. If any booking date falls inside the selected seasonal date range, that day will be calculated using the seasonal price.
- Seasonal Weekend Price: This price is used when a booking date falls inside a seasonal date range and also matches the selected seasonal weekend day.
Example: If a customer books a room for multiple nights, the system checks each night separately. Normal days are calculated with regular price, selected weekend days are calculated with weekend price, seasonal dates are calculated with seasonal price, and seasonal weekend days are calculated with seasonal weekend price.
After room selection, the Booked Rooms section shows the selected room, number of days and rent summary. The final total is calculated by adding total rent, tax and fee, then subtracting any discount.
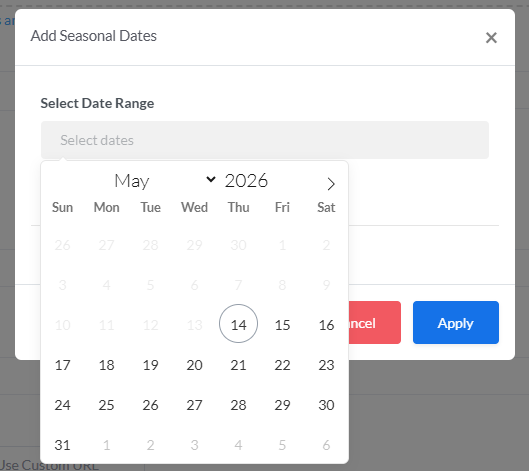
Set Seasonal Dates:
👉 Hotel owners can set seasonal date ranges for special pricing. If a customer books a room within these selected dates, the seasonal price will be used for those dates.
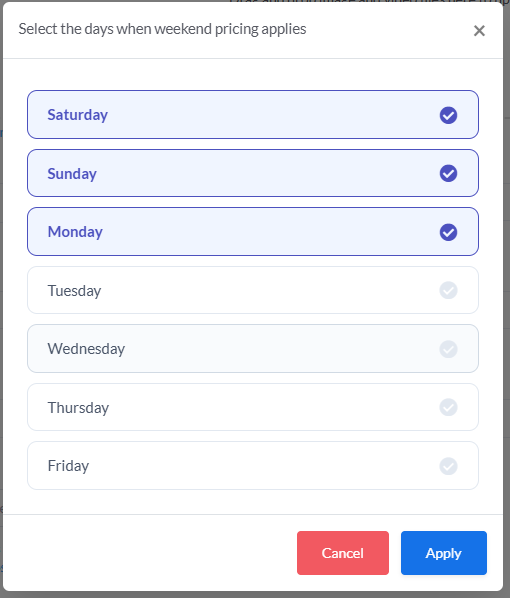
Set Weekend Days:
👉 Hotel owners can select which days should be treated as weekend days.
👉 The weekend price will be applied only to the selected days when they appear
inside the booking date range.
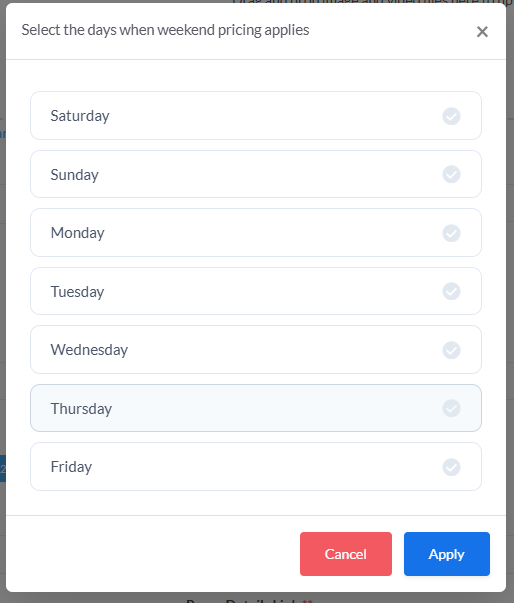
Seasonal Weekend Days:
👉 Seasonal weekend days are selected from the days available inside the selected
seasonal date range.
👉 If any of those selected days are booked during the seasonal
period,
the seasonal weekend price will be applied for those days.
Room Details Link:
👉 The room details link controls where customers will be redirected when they click the room details link shared through WhatsApp.
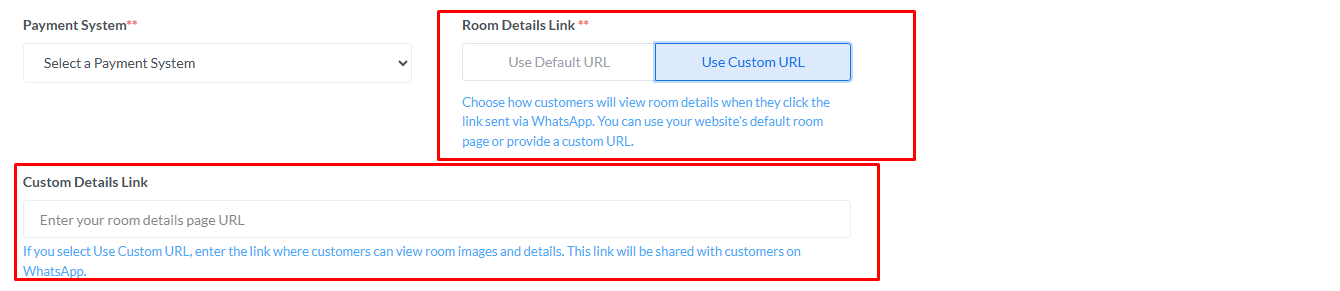
Use Default URL: The system will use the website default room category details URL, generated from the base URL and room category name.
Use Custom URL: Hotel owners can enter any custom URL where customers can view room details, images or additional information.
Refunds:
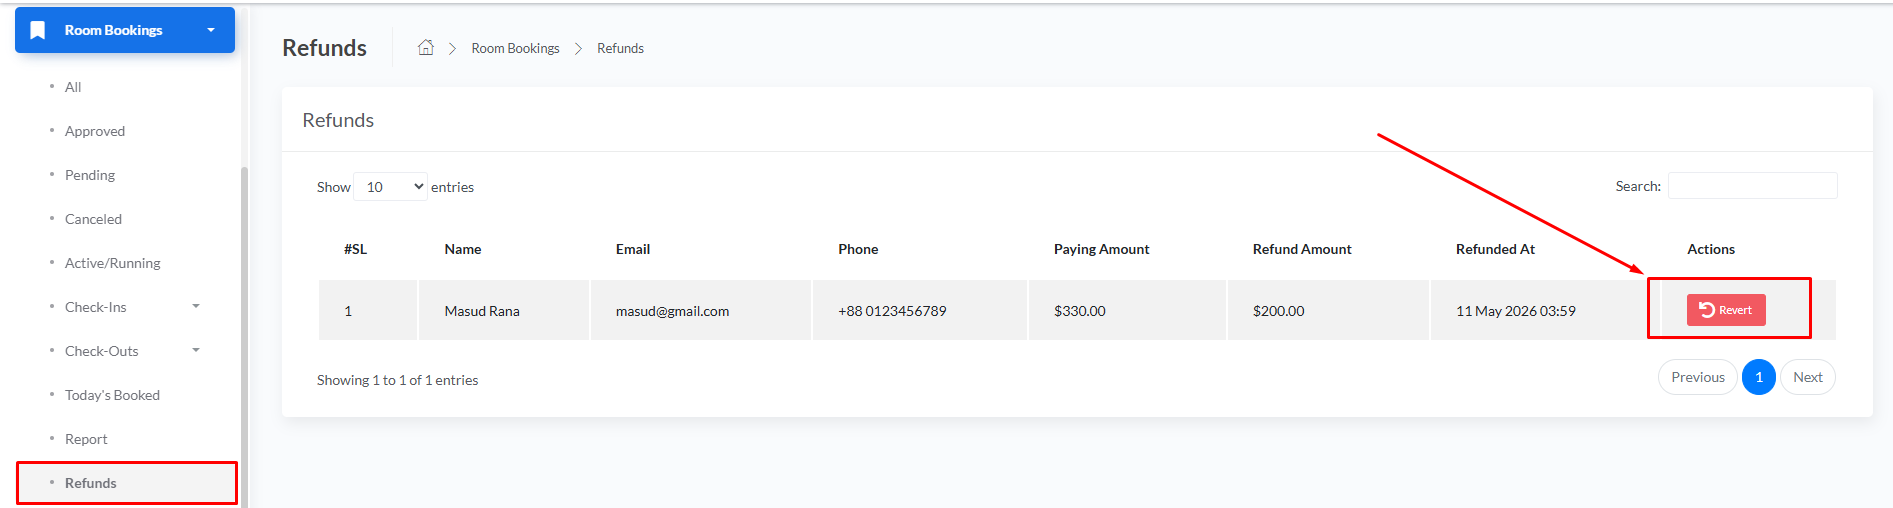
👉 Hotel owners and staff can view all processed refund records from this section.
👉 When a customer is refunded, the refund information will appear here with customer name, email, phone number, paying amount, refund amount and refunded date.
Refund Records:
👉 This section is used to keep track of refund history for room bookings.
👉 The actual refund amount should be paid to the customer manually or through any external payment method used by the hotel owner or staff.
Revert Refund:
👉 If a refund needs to be reversed for any reason, click the Revert button. The refunded amount will be reverted back in the system.
Report:
👉 Hotel owners and staff can generate room booking reports from this section.
👉 Reports can be filtered by date range, booking number, payment gateway and payment status to find specific booking records easily.
Room Booking Report:

After selecting the required filters, click the Submit button to view the report data.
Hotel owners and staff can also click the Export button to download the booking report as an Excel file.
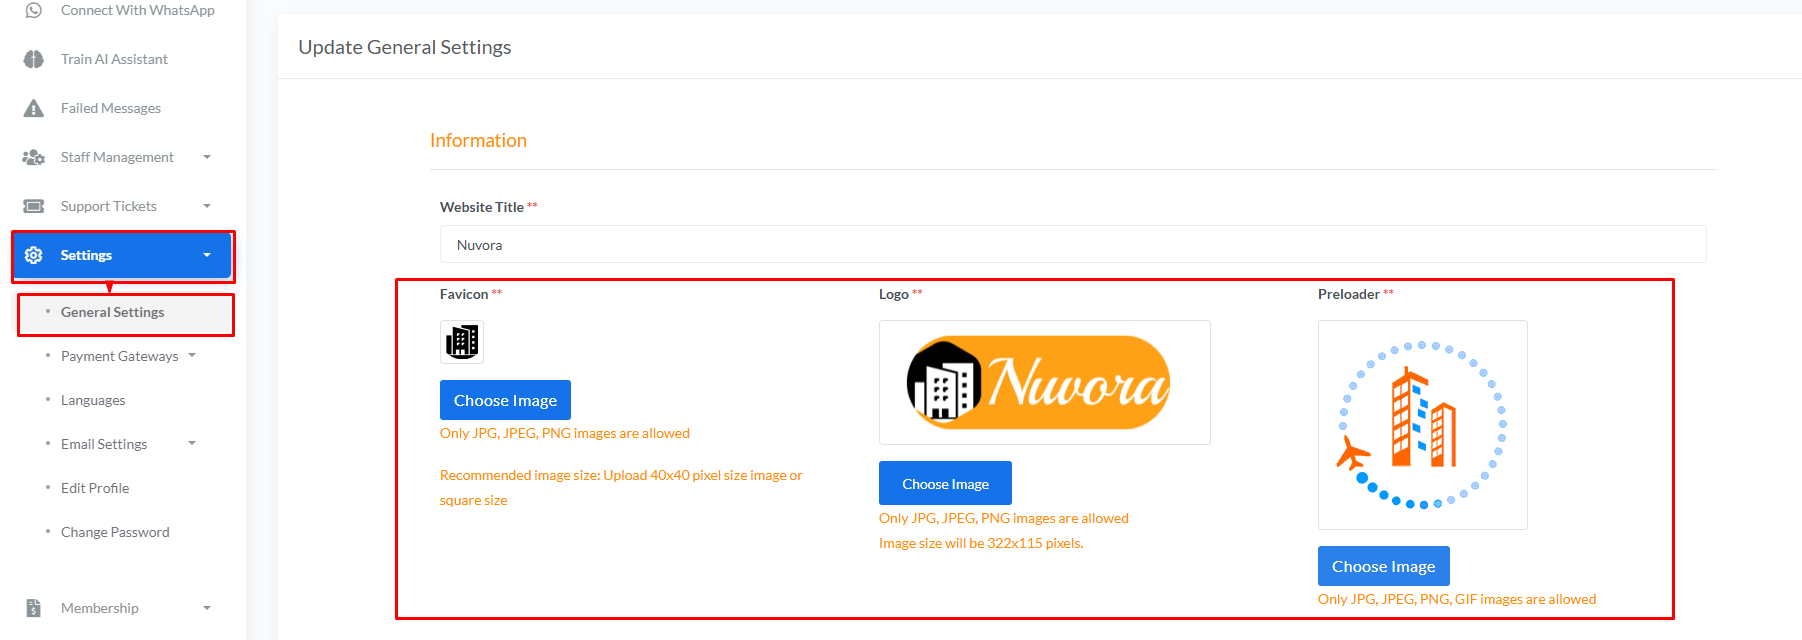
Logo & Favicon:
Payment Gateway Settings:
Online Gateways
👉 All the online payment gateway's credentials can be set in Settings > Payment Gateways > Online Gateways
Hotel Owners can also set the payment gateways in test / live mode
Offline Gateways
👉 Hotel Owners can create offline gateways to receive booking payments
👉 Hotel Owners can setup instructions & description (optional) which will be shown to customers in checkout page
👉 Hotel Owners can also enable / disable attachement status
- If attachement enabled, then customer will have to upload the image of their transaction during checkout
- If attachement disabled, then customer the attachement field wont be shown to customers during checkout

Language Management:
👉 Hotel owners can manage languages from Settings > Languages.
👉 For the dashboard, hotel owners can only use the languages created by the main Admin. These languages are available for changing or viewing the hotel owner dashboard language.
👉 For the frontend website, hotel owners can create unlimited languages and translate their website content based on their business needs.
Languages:

Hotel owners can set a default language for the website and dashboard if the language is available for that section.
To translate website keywords, click the Edit Keyword button beside the language.
The frontend language keywords will be used on the hotel owner's public website and customer-facing booking/payment pages.
These translations are especially used on pages such as:
-
{your_website_baseurl}/payment/redirect/{booking_id} -
{your_website_baseurl}/payment/booking-status/{booking_id} -
{your_website_baseurl}/payment/success-page/{booking_id} -
{your_website_baseurl}/payment/cancel-page/{booking_id}
For example, when a customer opens a payment link or views booking payment status, the text and messages on those pages will appear based on the selected website language keywords.
Dashboard translations remain controlled by the Admin and cannot be modified by hotel owners. However, hotel owners can fully customize frontend website translations for their own hotel website.
Email Settings:
Mail Information:
Hotel owners can configure basic outgoing mail information from Settings > Email Settings.
SMTP server configuration is managed by the main Admin. Hotel owners do not need to configure SMTP credentials manually.
Hotel owners can customize the following information:
- From Name: Defines the sender name customers will see when they receive emails from the hotel website.
- Reply-To Email: Defines the email address where customers can send replies after receiving emails.
Once configured, all booking, payment and customer-related emails will be sent using the Admin-configured SMTP server while displaying the hotel owner's selected sender name and reply email address.
👉 Important Notes:
- SMTP configuration is controlled by the Admin to ensure stable email delivery.
- Hotel owners only need to configure the visible sender information such as From Name and Reply-To Email.
- If email delivery issues occur, the Admin may need to verify SMTP server settings.
Mail Templates:
👉 Hotel owners can customize email templates used for customer communication.
👉 Hotel owners can modify the email subject, message content and branding to match their hotel business requirements.
👉 All customer emails sent from the system will automatically use the configured mail templates during booking and payment operations.
Support Tickets:
👉 Hotel owners can create and manage support tickets from Support Tickets > My Tickets.
👉 This section helps hotel owners communicate directly with the Admin team regarding technical issues, booking problems, payment concerns, WhatsApp integration issues or any other support requests.
My Tickets:
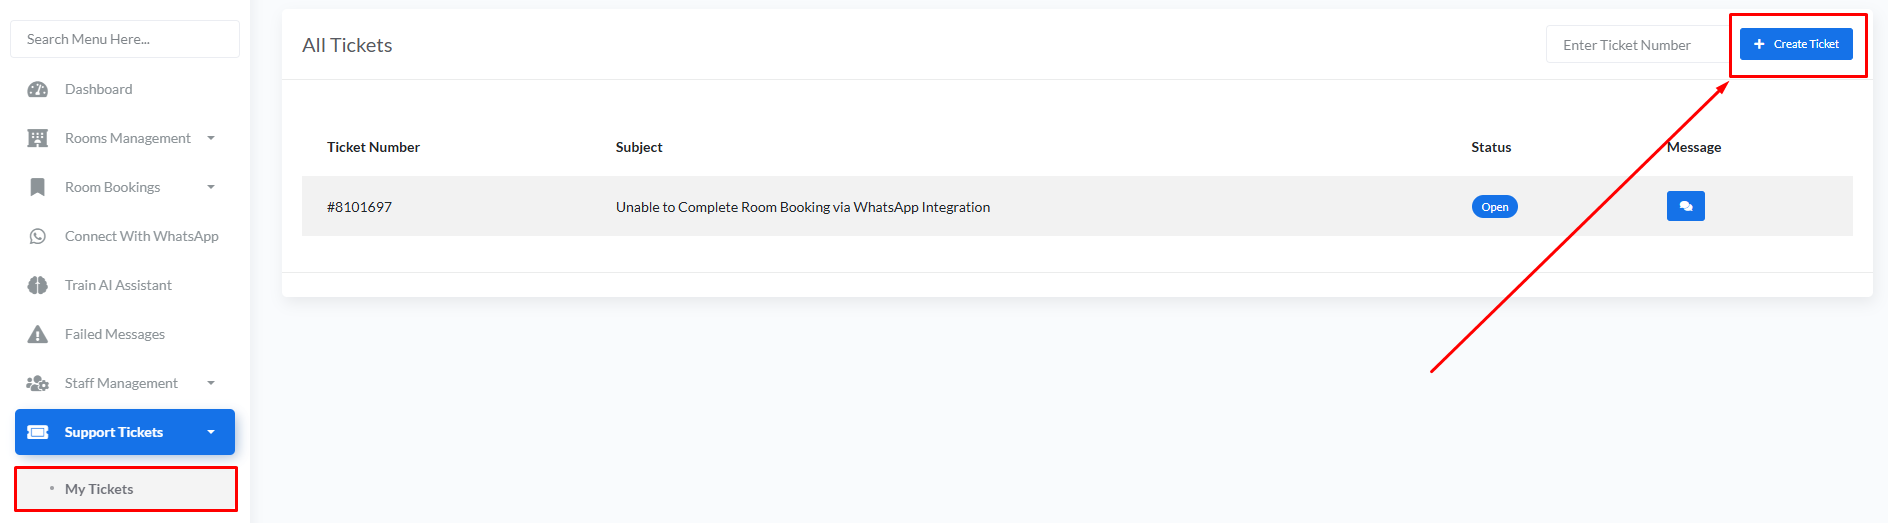
In this section, hotel owners can view all previously created support tickets along with ticket number, subject, status and conversation access.
Hotel owners can also search tickets using the ticket number.
Ticket statuses help identify the current support condition:
- Open: The ticket is active and waiting for Admin response or further discussion.
- Closed: The issue has been resolved and the ticket conversation has been completed.
Create Ticket:
👉 Hotel owners can create a new support request by clicking the Create Ticket button.

Ticket Conversations & Replies:
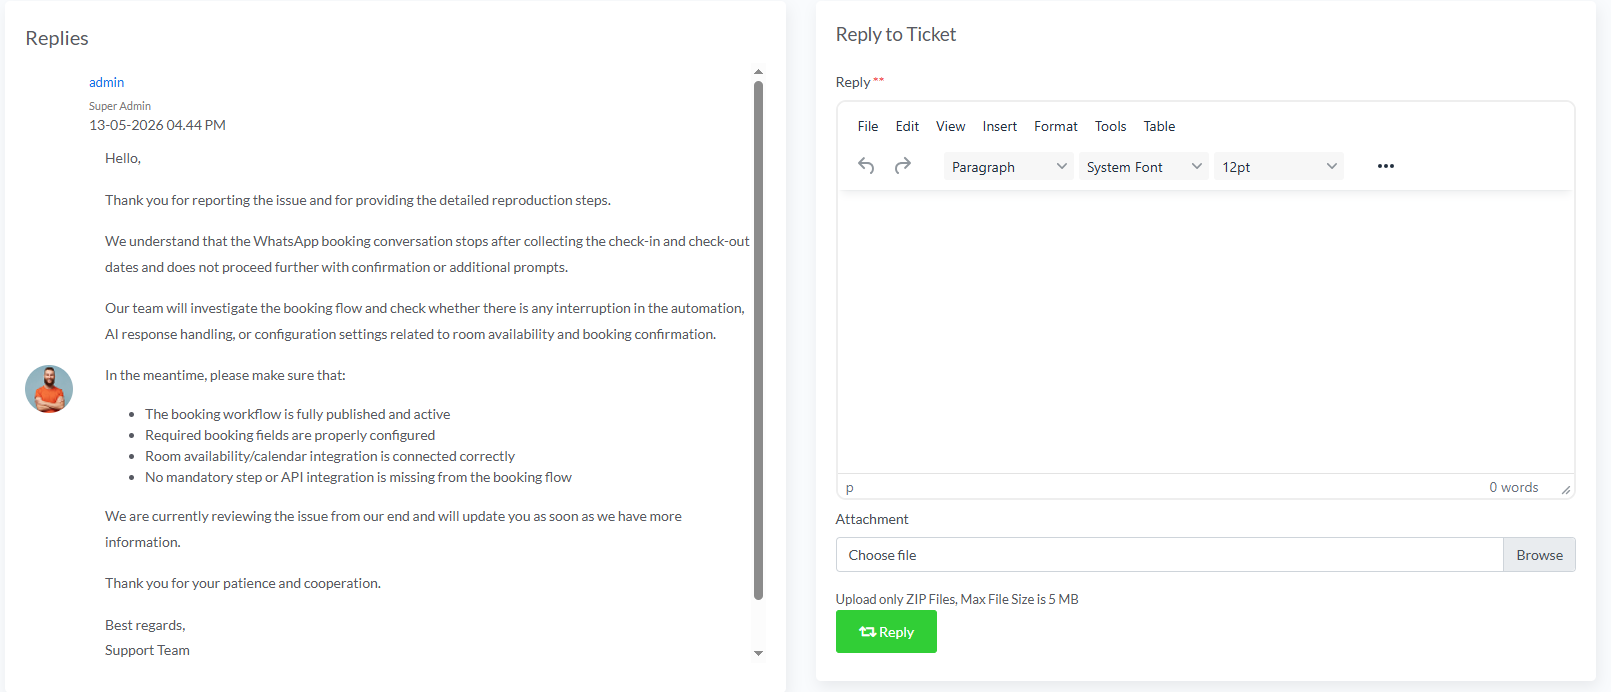
👉 Hotel owners and Admins can communicate directly inside the ticket conversation page.
👉 All replies, updates and support discussions will appear in the conversation history.
👉 Once the issue is resolved, the Admin may close the ticket to complete the support request.
Topup AI Credits:
👉 AI credits are used for AI-powered features such as WhatsApp AI replies, booking assistance and customer query handling.
👉 Hotel owners can purchase additional AI credits anytime, even if they still have available credits or when their current AI credit limit is finished.
Check Available AI Credits:
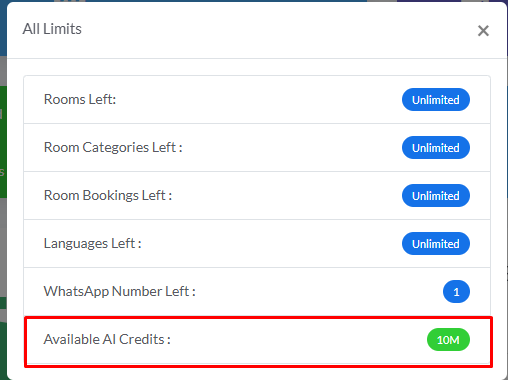
👉 Hotel owners can click the Check Limits button from the dashboard to view their current package limits and available AI credits.
👉 The Available AI Credits value shows how many AI credits are currently available for the hotel owner’s account.

AI Credit Recharge History:
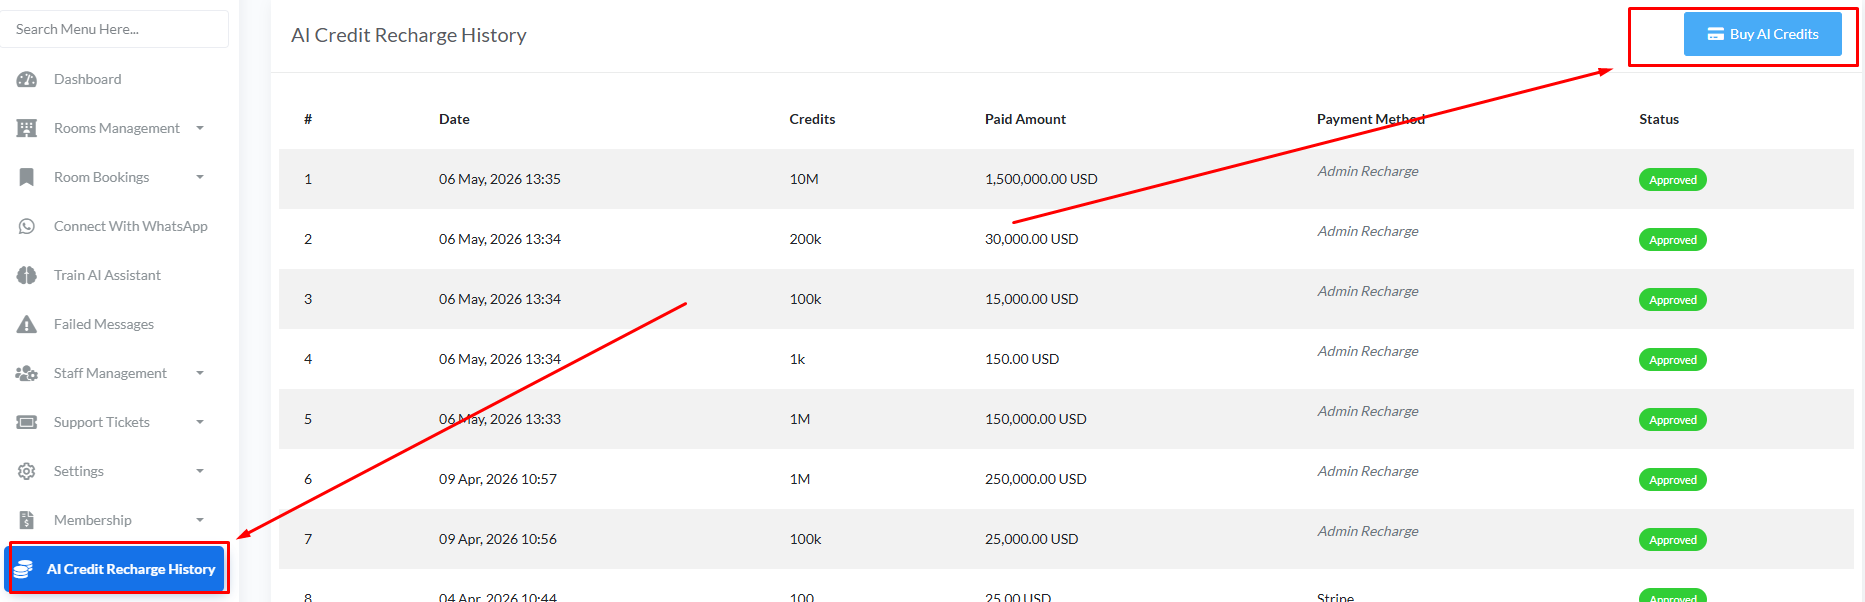
👉 Hotel owners can view all AI credit recharge records from AI Credit Recharge History.
👉 This section shows recharge date, purchased credits, paid amount, payment method and approval status.
Buy AI Credits:
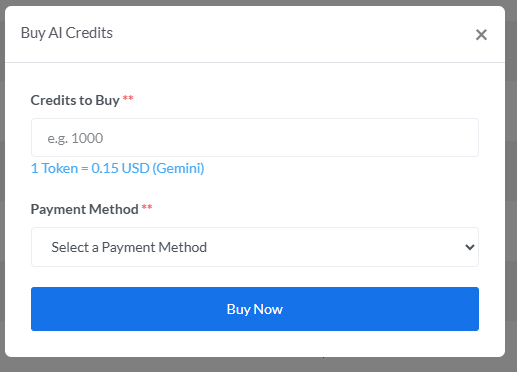
👉 To purchase AI credits, click the Buy AI Credits button, enter the number of credits to buy and select a payment method.
👉 After successful payment or Admin approval, the purchased credits will be added to the hotel owner’s available AI credits.
Advanced QR Builder:
Hotel owners can generate and manage custom QR codes from the QR Codes section.
QR codes can be used for sharing booking pages, payment pages, hotel websites, room information, WiFi access, contact details and more.
Generate QR Code:
From the Generate QR Code menu, hotel owners can create customized QR codes for different purposes.
Hotel owners can also customize QR code styles, colors and branding before saving.
Saved QR Codes:
All previously generated QR codes are stored in the Saved QR Codes section.
Saved QR codes help hotel owners quickly reuse frequently used booking, payment or promotional QR codes without generating them again.